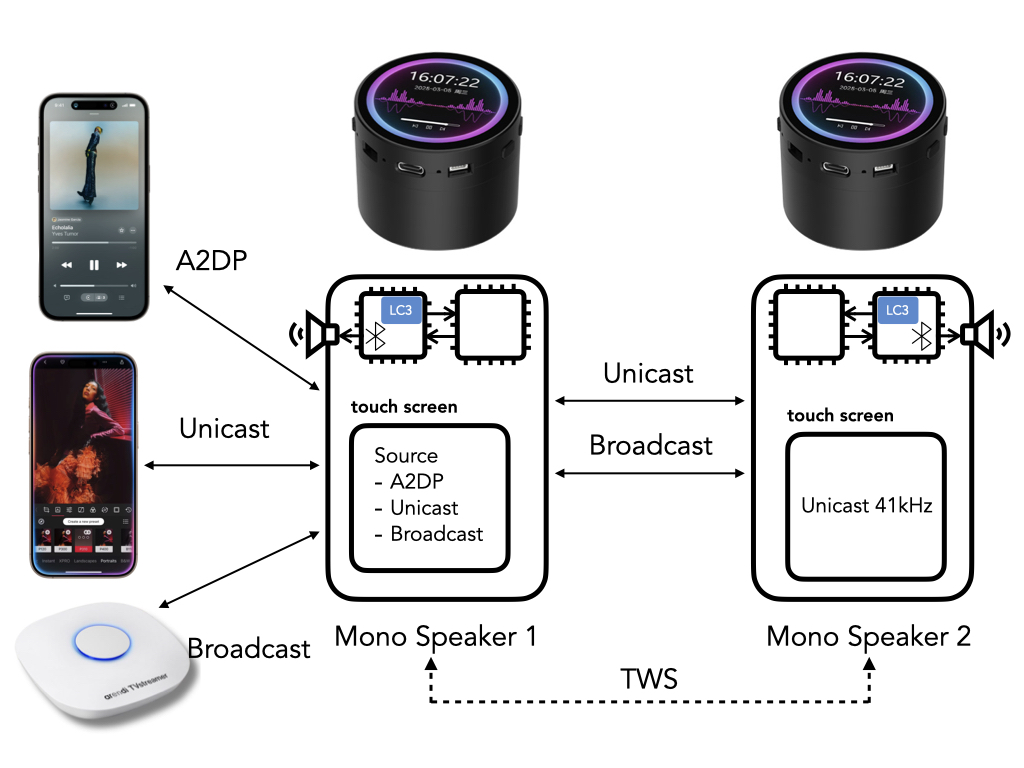
LE Audio on ESP32
In our previous post, we explored how accurate playback for True Wireless Stereo (TWS) can be achieved on an STM32F4 Discovery development kit with both Infineon CYW5551x (LC3 on-board) as well as a Nordic Semiconductor nRF54L15 (LC3 codec on the STM32) Controllers. While these work well, the setup isn’t suitable to carry around and demonstrate – especially for a demo with multiple devices, e.g. one sender and two or more receivers.
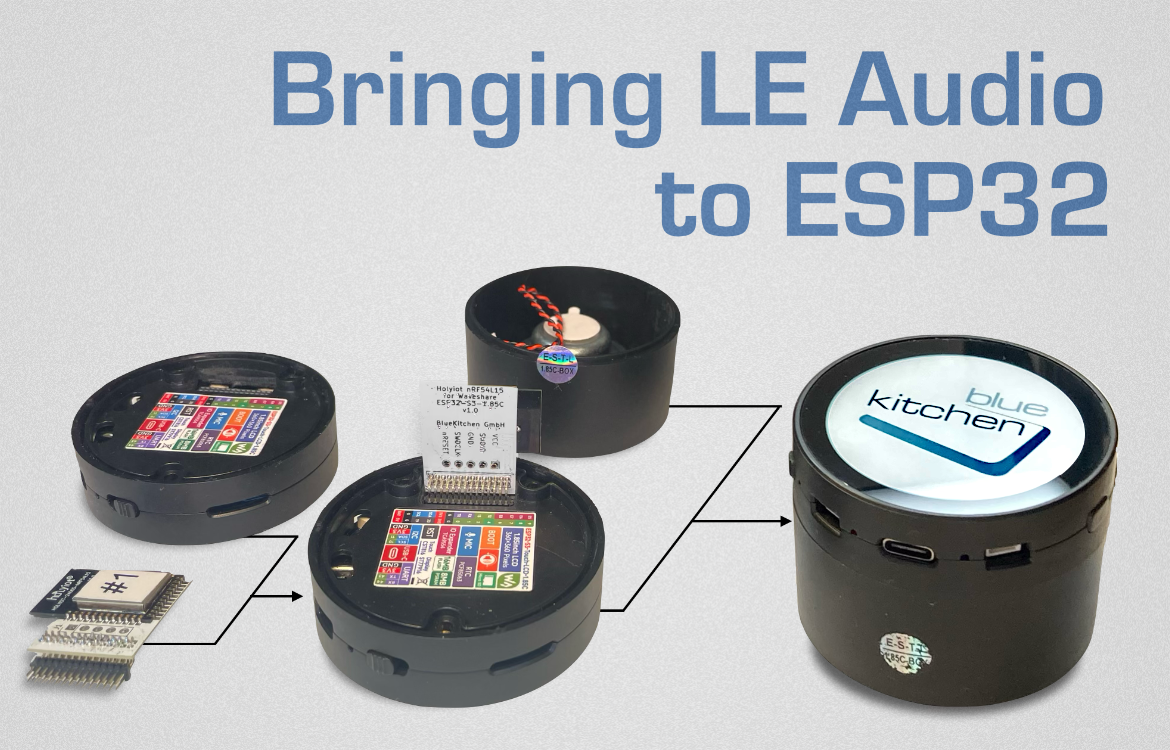
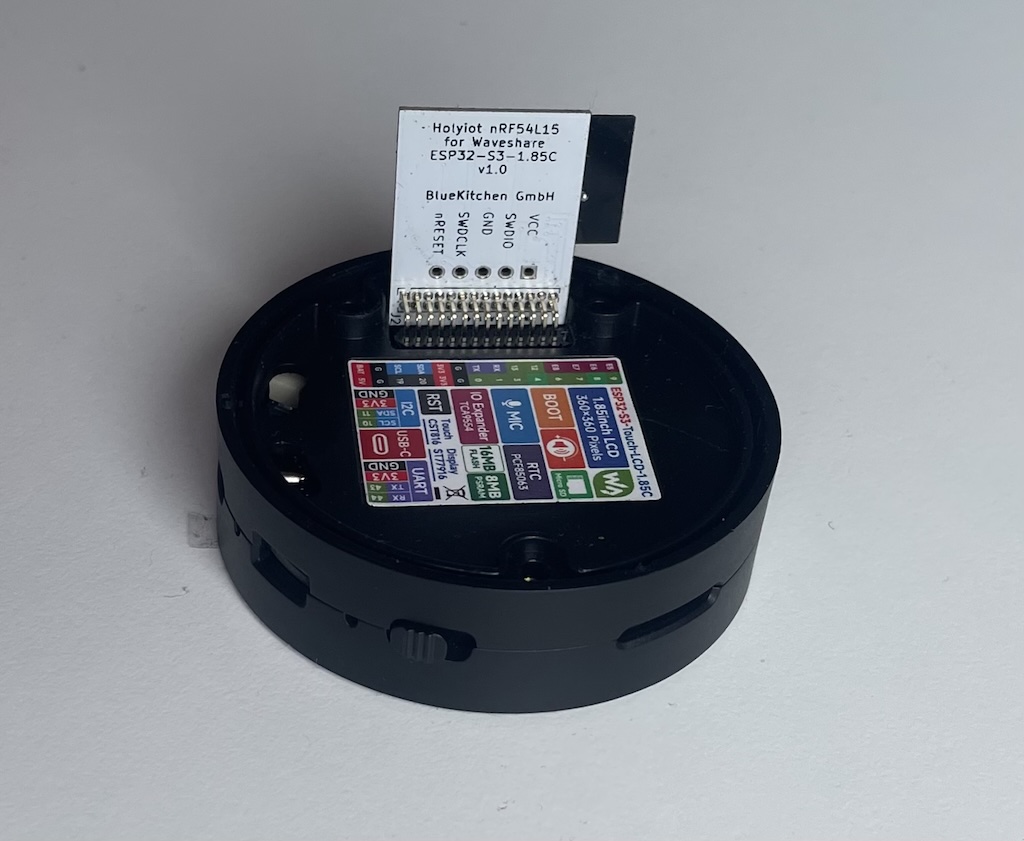
Therefore, we wanted to have a portable LE Audio demo device with a proper case, rechargeable battery, a graphics user interface and a built-in speaker. While pondering different options, a colleague sent a link to the Waveshare ESP32-S3-LCD-1.85C. It’s a small box based on an ESP32-S3 with a round LCD with touch support, battery and speaker. It even sports a 28-pin expansion port for attaching your own hardware. The “only” problem with this box is that Espressif doesn’t have any SoCs that support LE Audio yet including the used ESP32-S3. To bring LE Audio to the Waveshare ESP32-S3-LCD-1.85C, we decided to integrate an nRF54L15 Controller into it. This blog covers the integration steps and how accurate playback can be implemented on ESP32 variants.
Integrating nRF54L15 into the Waveshare box
The Waveshare ESP32-S3-LCD-1.85C, which we will just call “Waveshare box” or “the box” in the following, does not have much free space inside. An obvious way to increase the space would be to 3D-print an additional cylinder to increase the height of the box. However, we carefully measured the available space and decided that it should be possible to fit an nRF54L15 inside if we forgo one of the three mounting stand-offs.
We designed a simple Add-On that allows to attach an nRF54L15 to the expansion port of the box and provides a way to flash it. We also considered flashing the nRF54L15 from the ESP32-S3, so we added the required wiring, but haven’t looked into this yet.
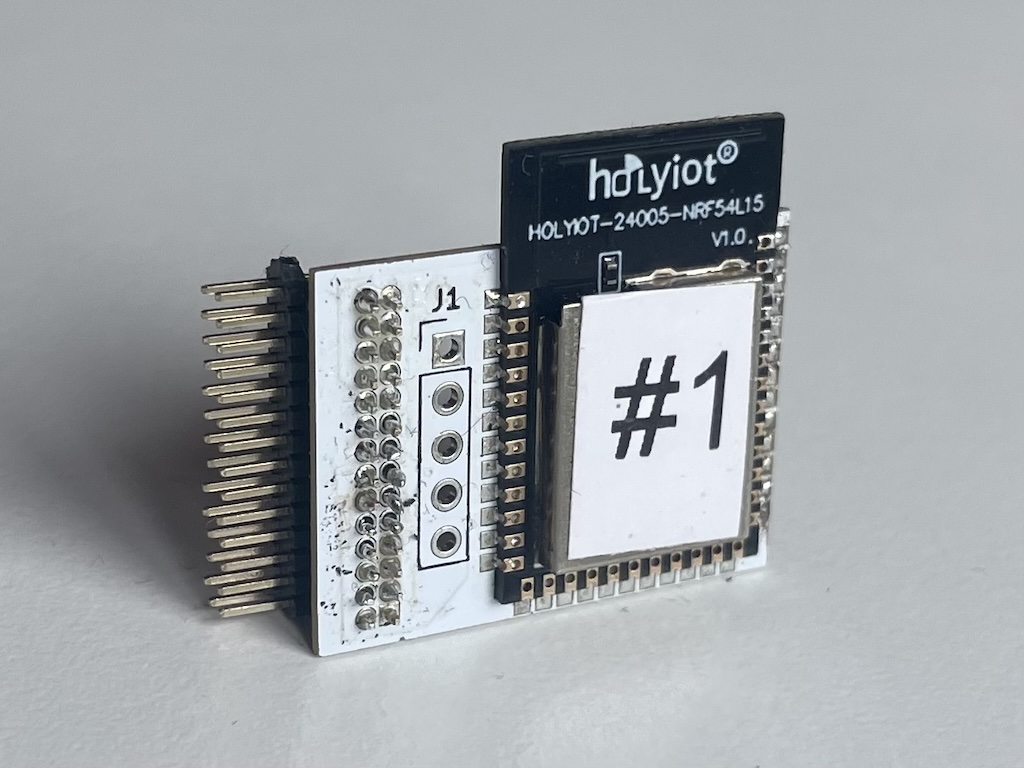
Looking for an nRF54L15 which is easy to solder, i.e. it can be soldered by hand, we found the Holyiot-24005 module from Holyiot, which is not listed on their website but available from Ali Express.
The most work would have been to draw the footprint of the Holyiot module, but we were pleasantly surprised that KiCAD 9 can directly import the Altium footprint provided upon request by Holyiot’s email support. Thanks!
To flash the nRF54L15 with our extended HCI UART bridge, we first intended to add a footprint for 6-pin TagConnect cable, but that was already too large for the available space. Instead, we opted for a poor-man’s SWD connector – just a few 0.1″ through-holes in a row.
The KiCAD project on GitHub contains all design files (incl. Gerber files for your favorite PCB service), if you want to build your own nRF54L15 Add-On. To flash it, you need to provide power by plugging it into the extension port and use a few jumper wires to connect it to your SWD programmer.
With the hardware tested and in place, let’s have a look at the software.
Accurate Playback on ESP32
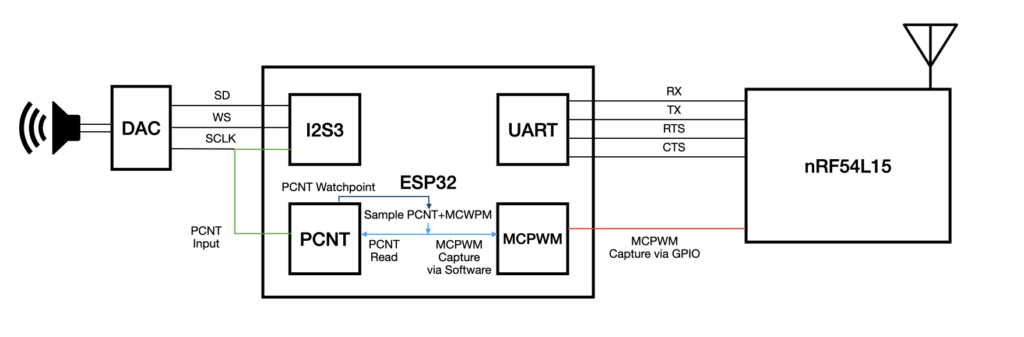
After having implemented accurate playback on STM32, we tried to port it to the ESP32 and have been confronted with a set of new puzzles. The main requirement for accurate playback is to capture micro second timestamps for the start of the I2S playback buffer.
Puzzle 1: Accurate timestamp for GPIO Toggle events
While the ESP32 has timers and GPIOs that can trigger an IRQ similar to the STM32F4, there is no obvious way to get an accurate timestamp for a GPIO Toggle event. However, it contains the Motor Control PWM (MCPWM) unit, which has three high-resolution timer-capture channels that can be triggered externally by a GPIO event or internally via software intended to control brushless motors. While not an obvious choice, these work well for our use case.
Puzzle 2: Accurate timestamp for DMA Complete events
Similar to the STM32F4, there’s also no way to get a timer capture for the DMA Complete event itself. On the STM32F4, we used a timer to count I2S bits and toggle a GPIO when the buffer was complete for this. On the ESP32, the Pulse Counter Module (PCNT) provides similar functionality. However, the PCNT can neither trigger a timer capture on the MCPWM nor toggle a GPIO. It only allows to trigger an IRQ. So, back to the drawing board.
To recap: we would like to know the exact time when a new audio buffer is sent over I2S. By using the PCNT to count I2S bits, we can always check how many I2S bits have been sent. We can also get the current time from the MCPWM.
With all pieces on the table, the approach became obvious. Instead of getting a precise timestamp for the start of the I2S playback buffer, we set a watchpoint on the PCTN to trigger an IRQ a few samples before the end of the current buffer. In the PCNT ISR, we are protected from other IRQs and atomically read the number of pulses and trigger a MCPWM timer capture, which results in a measurement (tx,px). See image below.

With the nominal bit time t_bit and the total number of bits in an audio buffer p0, we can then approximate the end of the audio buffer by calculating t0 = tx + (p0-p1) * t_bit.
Solution
As the ESP32-S3 allows for internal connections between peripheral units, the I2S bit clock can be internally routed to the PCNT unit – avoiding external wires – giving this overall setup:
With the hardware and audio playback in place, let’s have a look at TWS.
TWS Measurements
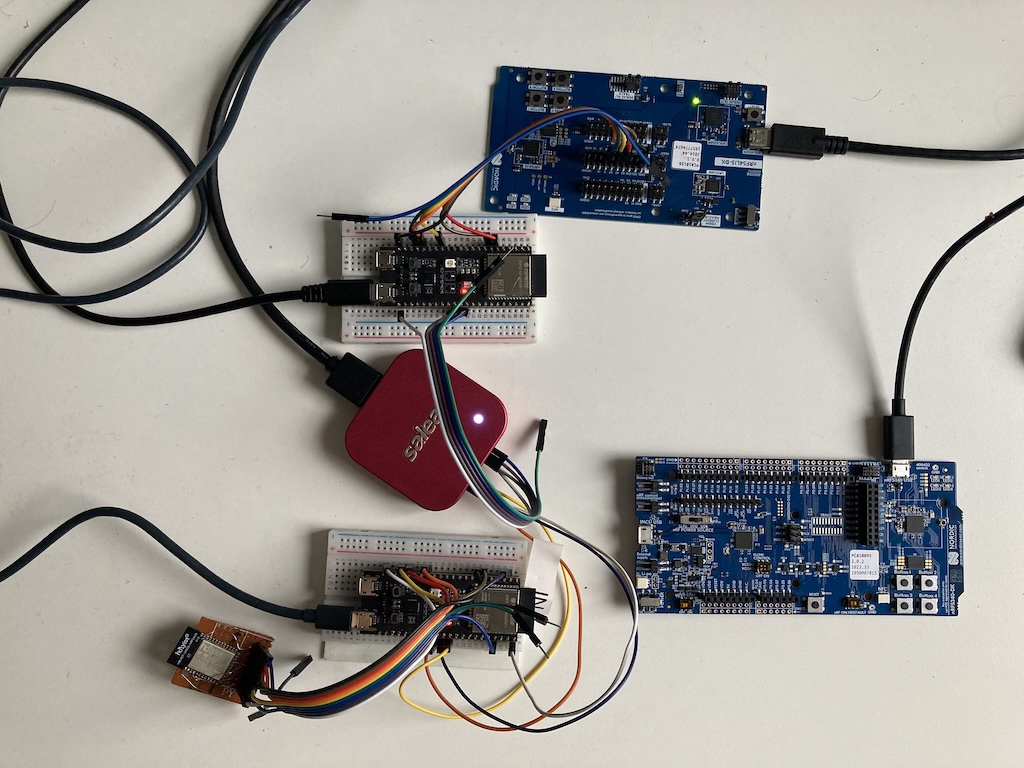
As we already have the nRF54L15 Add-On connected to the extension port of the Waveshare box, we could not access the I2S over the extension port at the same time. Instead, we’ve created a duplicate setup with two Espressif ESP32-S3-DevKitC-1 development kits with a nRF54L15 development kit, as well as the hand-made breakout board for the Holyiot version for the measurement setup.
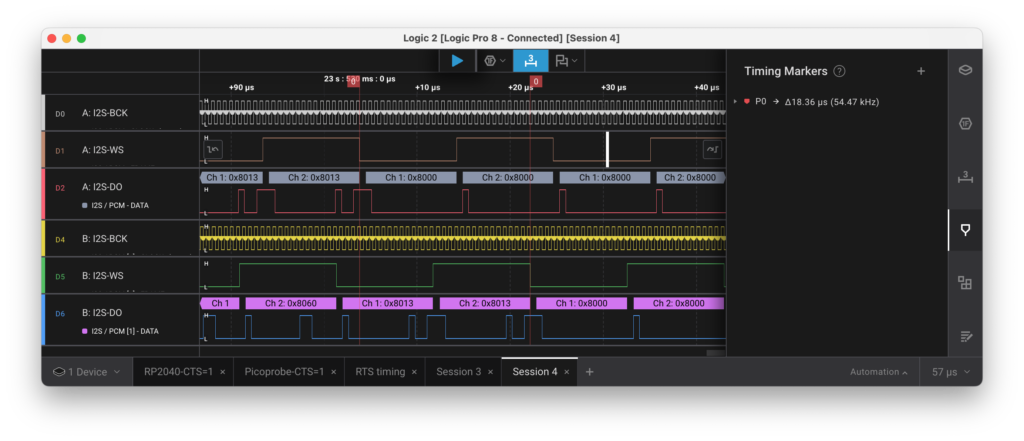
As with the previous TWS measurements, we have connected the I2S lines of two setups to our trusted Salea Logic 8 Pro and streamed a sine wave over Broadcast. As shown in the logic trace, the sample 0x8000 shows up on both devices with less than a single sample time – perfect!
Outlook
With the hardware and audio playback in place, we’ll work on a complete LE Audio demo showing all Unicast and Broadcast roles in a standalone setup.
Stay tuned …